Docs
Making Your Own Kit
Kit Authoring mode: building a pipe kit from your own meshes.
PipeIt includes a Kit Authoring mode for making your own static meshes into a pipe kit. The mode helps you place the sockets and orientation data PipeIt needs to know how each piece connects.
Prefer to watch? The Advanced Features tutorial covers kit authoring on video:
Creating a kit
Right-click in the content browser and create a Pipe Kit (under the Pipe It category). The kit opens in the Pipe Kit Editor: a board with one lane per piece category, a live preview, and a details panel. Each card on the board is one kit entry: a mesh playing a role.
- Add meshes by dragging them from the content browser onto the board. If a mesh already has sockets, PipeIt detects its category from them; drop onto a specific lane to choose the category yourself.
- Several cards in one lane are variants of that role, cycled in the editor with Alt + Wheel.
- The toolbar’s validation button shows All valid or the number of issues; clicking it jumps to the first problem.
What a kit needs
A kit entry describes a piece’s role (cap, straight, corner, tee, cross, bracket, pipe) and where its pipes connect. PipeIt uses sockets on each mesh to work out how pieces align and stretch: one socket per pipe opening, with the socket’s red X-axis arrow pointing out of the opening.
What each role expects:
| Role | Sockets |
|---|---|
| End cap | None. Instead, align the mesh so its pipe-joining face is at the origin (see Recenter + Align below). |
| Straight / Pipe | Two sockets facing opposite directions, one per opening. |
| Corner | Two sockets meeting at roughly 90° (75–105°). Shallower angles read as a half corner. |
| Tee | Three sockets: an opposite-facing pair (the main run) plus one at a right angle (the branch). |
| Cross | Four sockets forming two opposite-facing pairs at right angles. |
| Bracket clamp | Two pipe-end sockets, plus one LINE socket per arm. |
| Bracket line | A CLAMP socket and a FOOT socket, one per end. |
| Bracket foot | A LINE socket and a WALL socket. |
Bracket sockets
Bracket parts are the one place where sockets do not mark pipe openings, so use this rule when you are choosing which socket button to press:
Working through a bracket, part by part:
- Clamp: its arm sockets look toward the line pieces, so add a Line socket per arm (plus the two ordinary pipe-end sockets that grip the pipe).
- Line: one end looks back at the clamp (a Clamp socket), the other looks at the foot (a Foot socket).
- Foot: one side looks at the line (a Line socket), the other at the surface it stands on (a Wall socket).
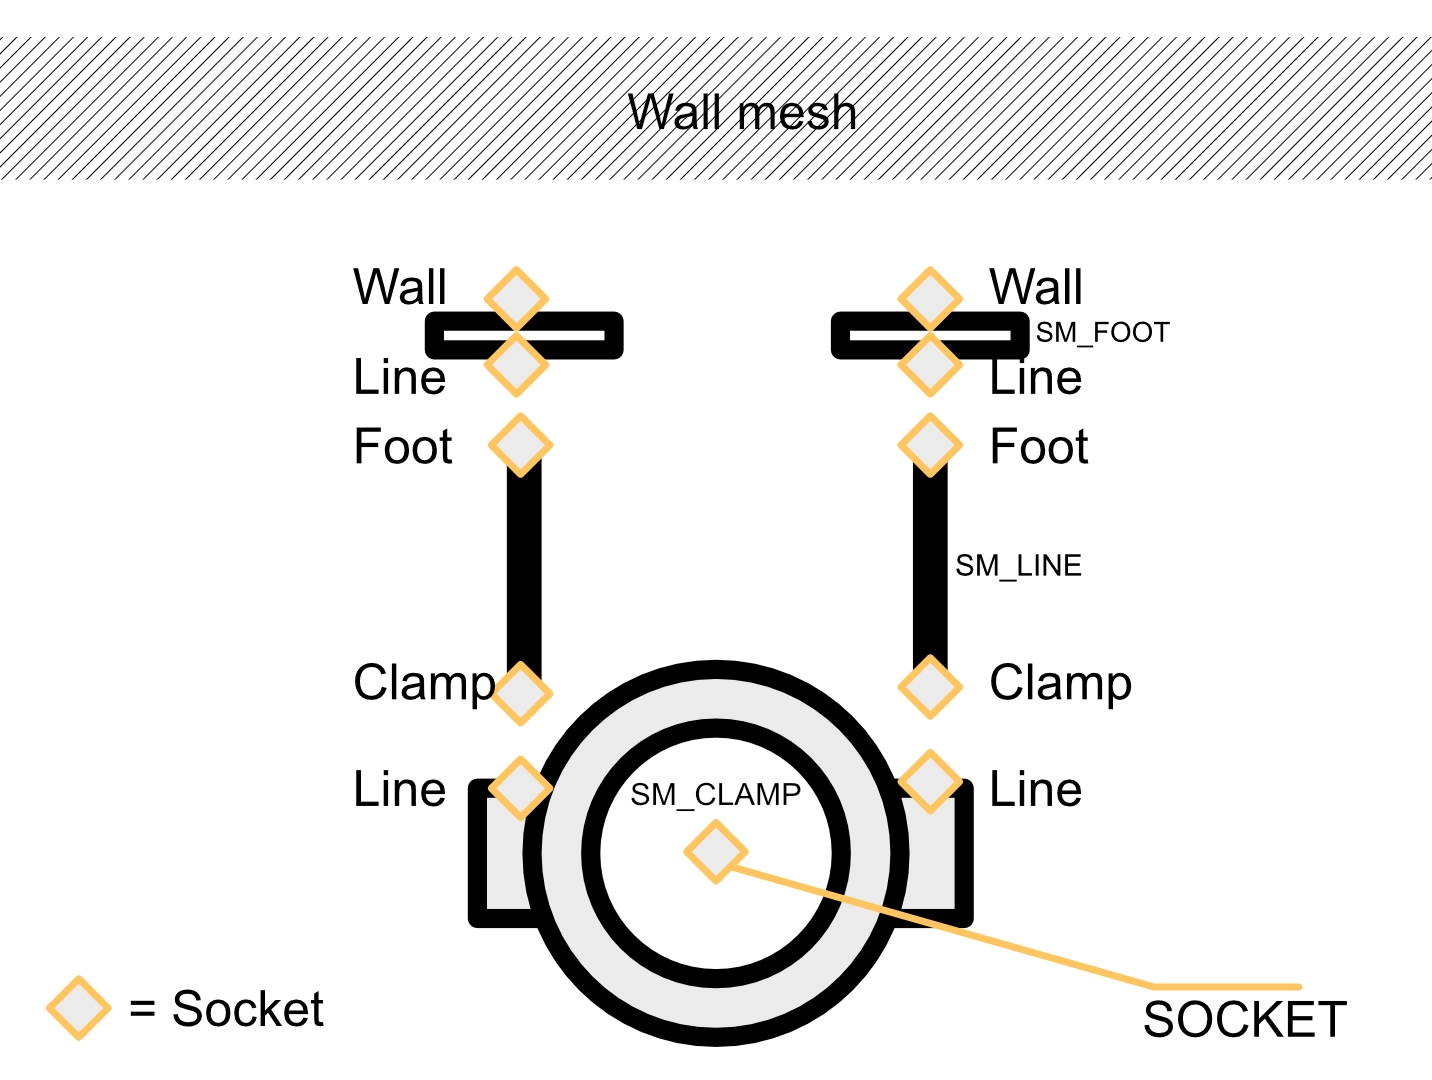
The whole chain: the clamp looks at the lines, a line looks at the clamp and its foot, a foot looks at its line and the wall.
Preparing a mesh
Double-click a card (or right-click it → Edit Sockets…) to open its mesh in the Static Mesh Editor with the PipeIt Kit Authoring panel active. The panel is ordered as the workflow:
- Select geometry. Pick a selection mode (vertex, edge, face, or UV island, keys 1–4) and click the mesh. Shift adds, Ctrl removes, dragging paints, Ctrl + Shift + drag box-selects.
- Create sockets. Select a pipe-opening face and click Create Socket. The socket lands at the selection’s center and records which way the opening faces. The Line / Foot / Wall / Clamp buttons create the bracket sockets the same way; Bracket sockets above tells you which one goes where.
- Fix the origin. Recenter to Selection moves the mesh origin to the selection’s center. Recenter + Align is for end caps: select the face that joins the pipe, and the mesh is rotated and moved so that face sits at the origin, pointing the way PipeIt expects.
- Auto-Orient from Sockets. One click, no selection needed: PipeIt infers the piece’s category from its sockets and rotates and re-centers the whole mesh into the canonical orientation.
The Reads as: line under the selection buttons tells you where you stand at all times: which category the sockets currently describe, whether the orientation still needs Auto-Orient, or, in plain words, what is wrong (a missing socket, two sockets on the same spot, a branch that is not perpendicular).
Everything the mode does is a normal undoable edit to the static mesh; there is no separate save step. Save the mesh, and the sockets and orientation travel with it.
Workflow
- Create the Pipe Kit asset and drag your meshes onto the board.
- For each piece: open it from its card, create a socket on every pipe opening (plus bracket sockets on bracket parts), then Auto-Orient from Sockets until Reads as: shows the right category in green. End caps skip the sockets and use Recenter + Align on the joining face.
- Watch the kit editor’s validation button reach All valid.
- Pick the kit from the Pipe It toolbar menu and draw with it.